Preparation
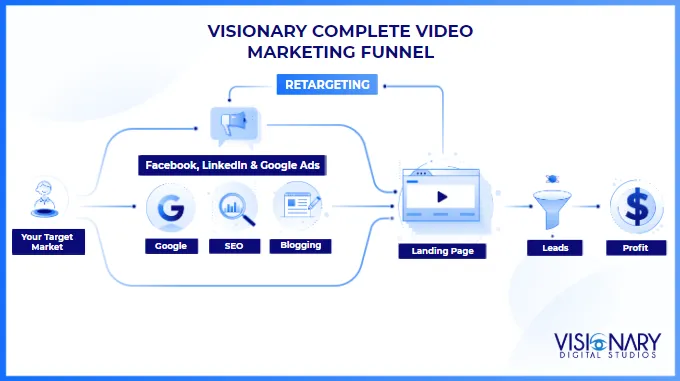
The wonderful world of Facebook Advertising for your business …
Are.You.Ready!?
Allow 15 minutes to work through these setup steps. Because your personal Facebook account will become the login to manage your Facebook business page, these steps should preferably be completed by the person who will be in charge of managing your business’ Facebook page (not mandatory). If you’re unsure, it’s best that the Director of the company or the Marketing Manager completes these steps.
Keep in mind – you’re always welcome to contact your Visionary Creative Director for help when you need it.
You will require the following information on hand to complete the setup:
– You should already have a Facebook page setup for your business. If you don’t, please contact The Visionary Team and we’ll help you create it.
– Your business ABN
– Your website’s WordPress login
– Your Website Administrator’s contact details (if you have one)
1. Setup Facebook Business Manager
“Facebook Business Manager” groups all of Facebook’s Advertising and business functionality together in one place. If you’ve never run ads before, you’ll need to set this up.
OK … here we go.
Firstly, navigate to
https://business.facebook.com/
Login as your personal Facebook Account, so that we can setup your personal Facebook account as having Administrator access to your company’s Facebook page.
Click “Create Account”

Fill out your details below:
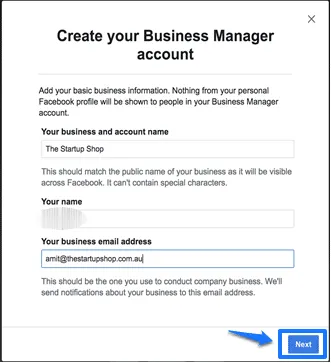
– Fill out your details below

You should now have a successfully setup Facebook Business Manager.
Nice work!

2. Claim your company’s FB Business Page:
OK, now that you have setup Facebook Business Manager for your company, it’s time to link Business Manager to your company’s Facebook page.
In Business Manager, make the following navigation:
Business Manager -> Business Settings
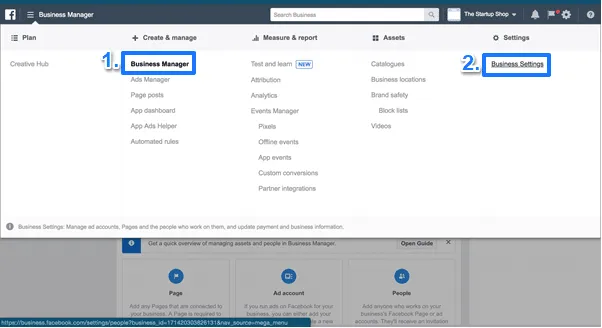
Pages -> Add -> Add A Page

Search for your company’s page and click “Add”
Next, grant The Visionary Team access to manage your account, using the following steps:
People -> Add
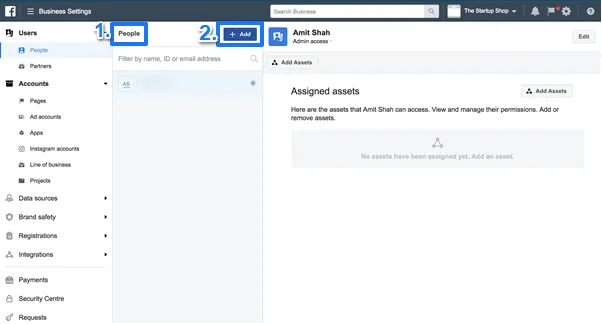
Check “Admin” access so that we have access to everything we need. Note that you can revoke this access at any time.
Enter the email address for the Visionary Facebook Ads team:
DigitalMarketing@visionarydigitaltsudios.com
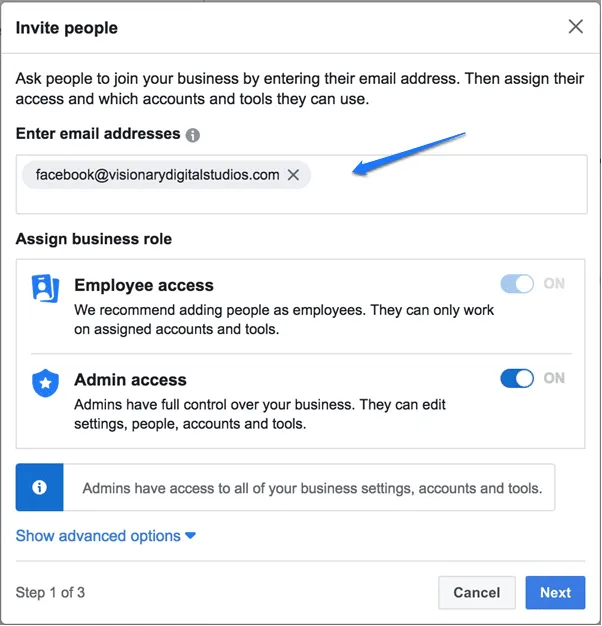
Select your business Facebook page, and on the right hand column, ensure all permissions have been granted. Click “Invite”, then “Done”
3. Setup Facebook Pixel In Your Website
The Facebook “Pixel” is a little piece of code which allows Facebook to track the people that view your website and what actions they take. This information can be used by Facebook to help find the optimal people to show your Ads to!
So … we want to start this tracking ASAP, even before your Facebook Ads are running.
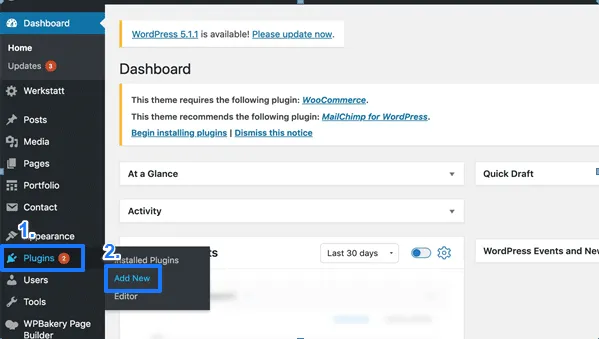
To setup Facebook Pixel in your website, you will install a WordPress plugin called “Pixel Caffeine”. Here are the steps:
– Login to your WordPress Website
– Navigate: Plugins -> Add New
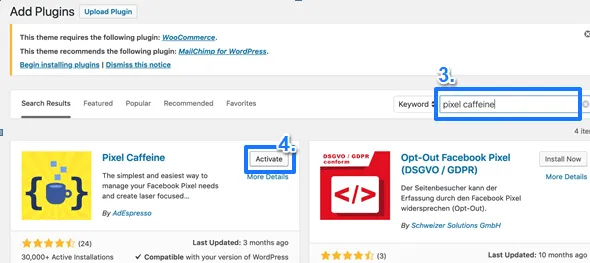
– In the “Search Plugins” box, search for: Pixel Caffeine, then click “Activate“:
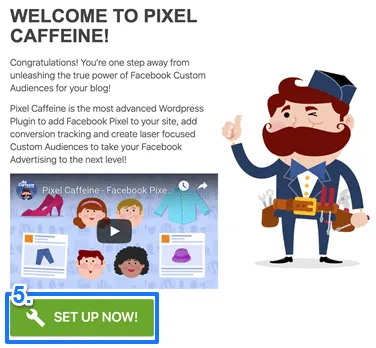
– Next click “Set Up Now“:
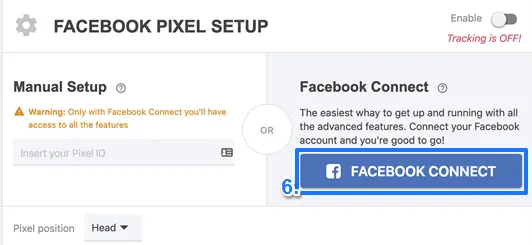
– Click “FACEBOOK CONNECT“:
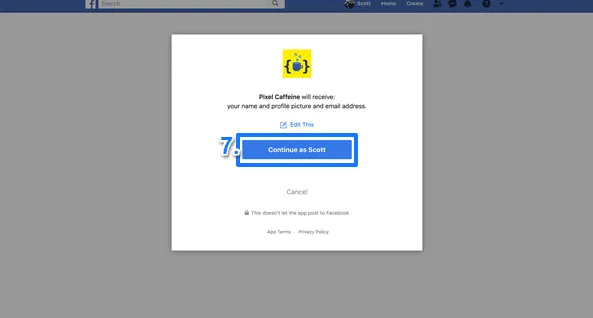
– Click “Continue as XXXX” :
You’ll reach the following screen.
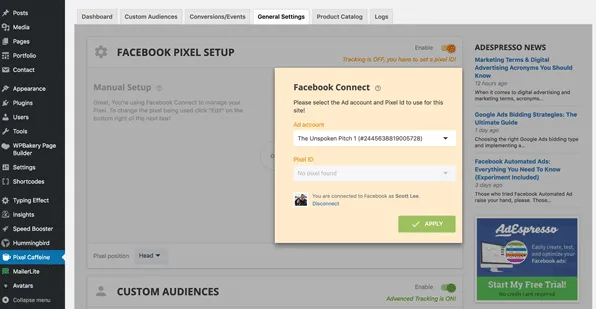
This is all the setup needed from your side on the Facebook Pixel. The Visionary Team will complete the setup from here. Please move on to the last step below!
4. Setup Google Analytics and Provide Access to The Visionary Team
Now we need to setup Google Analytics reporting, so that we can track the results of your video, and optimise your website for further success. This task can be technical, so it’s best your website administrator completes it. It will take them 5 minutes, and they have likely already set this up.
Firstly, setup Google Analytics for your website.
Here are some simple instructions to get this done:
https://support.google.com/analytics/answer/1008015?hl=en&ref_topic=3544906
Next, add The Visionary Team as an “Admin” user in Google Analytics.
This can be done by taking the following navigation in Google Analytics:
Admin -> User Management -> “+” icon -> Add Users -> Add “DigitalMarketing@visionarydigitaltsudios.com” (the email account we’ll use for viewing the reports)
Ensure all boxes under “Permissions” are checked, and click “Add”
(NOTE – If you’d prefer to only provide us “read” access, that’s fine – however in that case we’ll also ask your team to setup our reporting for us).
Excellent work! Now … advise your Visionary Creative Director and they will go ahead and complete the setup on your behalf.
Here’s what The Visionary Team will do next:
– We’ll finish the setup of the Facebook Pixel for you and install it in your website
– We’ll setup your Facebook Ads account, so that you are ready to run ads
– We’ll setup our team to access and manage your ads
– We’ll setup your reporting, so we can constantly monitor and advise on progress